Landing Page Monkey
Tutorials and FAQs
Tutorial Videos
Watch these videos for step-by-step guides on useful features!
Questions and Answers
Here are some of our most frequently asked questions!
LandingPage Monkey Agency License
If you have purchased an AGENCY LICENSE for LandingPage Monkey, you have 3 options:
1 Put a ZERO (0) in the field for the JVZoo ID on your Account Page. This will remove the
"Powered by.... " branding from any pages you save AFTER you have
done so (any existing pages will need to be re-saved)
2 Put your JVZoo
affiliate id where requested on the Account Page so you earn commission if
anyone clicks and buys LandingPage Monkey for
themselves. Remember, this will probably be your clients' prospects, as opposed
to your clients, so the potential is huge.
3 Download your client's page from our
server and upload it to your own - or the client's. In which case the link will
not be displayed
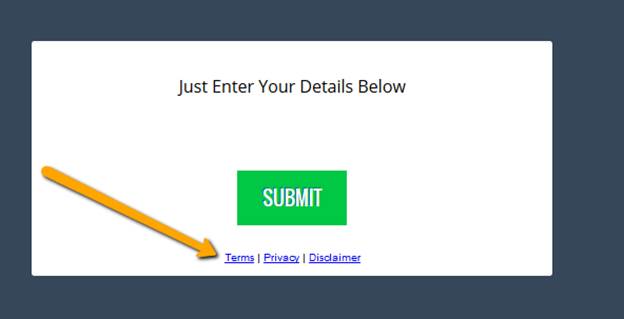
You can add links to Privacy Policy, Terms of Service,
Disclaimer, etc to your landing page by completing
the "Privacy Text" field
In this field you can put the HTML for your links.
For Example:
<a href="http://mywebsite.com/terms.html">Terms</a>
| <a href="http://mywebsite.com/privacy.html">Privacy</a>
| <a href="http://mywebsite.com/disclaimer.html">Disclaimer</a>
Be sure to change "mywebsite.com" to
your own domain!
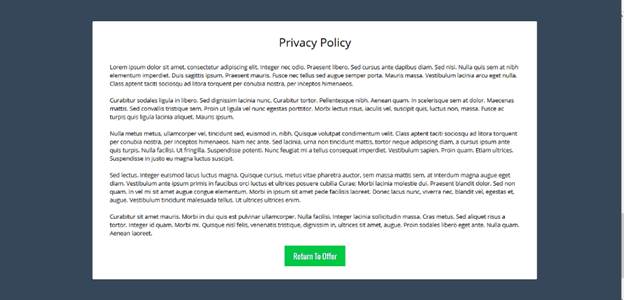
Furthermore: We can host your legal pages:
Create a separate "landing page" for each of your
legal pages :
- Step 1 Button Text set to "Return to
Offer" and URL back to original landing page
- Box Width set to 70%
- Page Content Headline text set to, for example,
Privacy Policy
- Main text contains your legal wording
To add a form created in WuFoo to
your LandingPage Monkey page
1 Create your form in WuFoo
2 Select "Share"
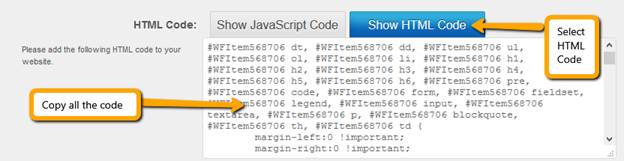
3 To get the HTML code, scroll below the javascript/iframe/WordPress embed codes to "Are you a
Developer?" 
4 Download
the .zip file and unpack it
5 Open
the index.html file with a text editor
6 Select
everything between <form> and </form>
7 Copy
this and paste it into the Custom AR Code box in your landing page
Currently the only fields supported in the autoresponder form
are the NAME and EMAIL fields.
However there is a
workaround for adding additional fields of your choice such as Phone,
Zip code, Address etc.
You can direct your customers to the hosted
form on your Autoresponder, if it has this feature, by
hyperlinking your Button Text in Step 1 directly to the form and bypassing Autoresponder Integration in LandingPage Monkey
LandingPage Monkey
Please check the zoom settings of your browser as sometimes
the setting prevents the advanced button from showing/
With all browsers, you can reset your Zoom setting by
pressing CTRL and 0 (zero) at the same time.
Here's a screenshot showing where you can find the Advanced
Button:

LandingPage Monkey
(to discover the answer to this question for MonkeyPlayr Mailgate, please see
article: MonkeyPlayer Mailgate
Autoresponders)
In this article
- Aweber
- GetResponse
- Mailchimp
- Custom Code
- Rapid Mailer
- Constant Contact
You can integrate your landing page with any autoresponder
that provides you with the RAW HTML code, not the Javascript
version.
We integrate with Aweber, Get Response and Mailchimp,
directly without the need for the raw code - see below or the step by step
video in the HELP section of your account
For
other autoresponders - you need to choose the "Custom
Code" option is step 3 of Create
Page and paste in RAW HTML code.
This will insert your opt-in form on the second page of your landing page , which in turn adds any leads to your list in your
autoresponder. See below or the step by
step video in the HELP section of your account
At the end of the article, we've included a link to a video
to show you how to integrate LandingPage Monkey with Rapid Mailer as
this is a little more complicated that with other autoresponders
Exception
Sendlane doesn't use a standard naming convention system
throughout it's different forms for us to be able to
pick up on correct fields. ie. What the
"Name" field might be called on one Sendlane
form is different from what it might be called on another Sendlane
form so there is no way to pick it up automatically.
Aweber:
Use the dropdown arrow to choose Aweber
as your AR Type
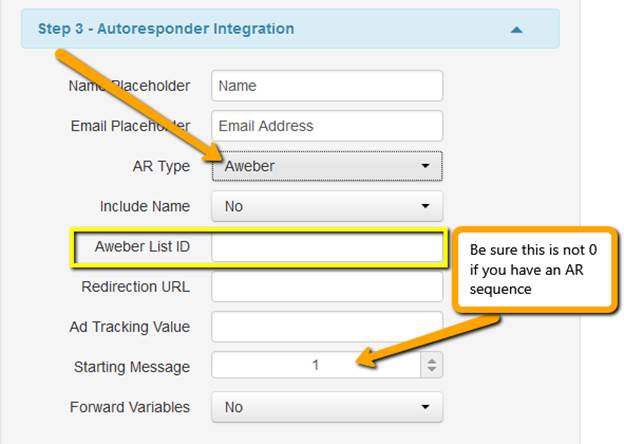
For help with finding your Aweber
List ID please refer to this document:
https://help.aweber.com/hc/en-us/articles/204028426-What-Is-The-Unique-List-ID-
GetResponse:
Use the dropdown arrow to choose GetResponse
as your AR Type
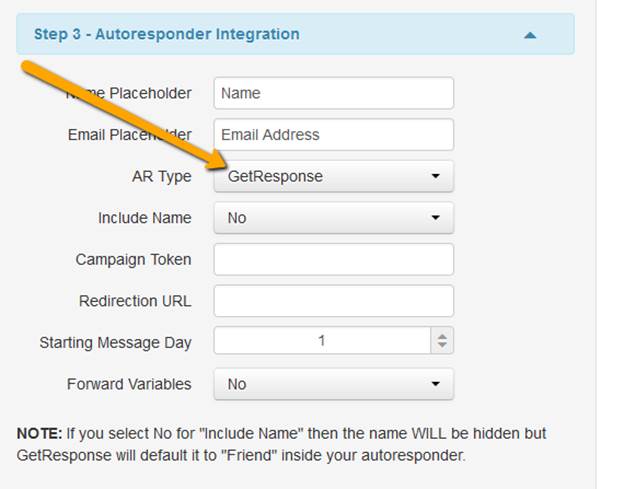
To find your Campaign Token:
- Log in to your GetResponse
account
- Click the down arrow at "Your Current Campaign" (top
right of dashboard window) and scroll down to click on "Campaign
List"
- Locate the campaign to which you want
subscribers added and copy the campaign token

MailChimp:
Use the dropdown arrow to choose MailChimp as your AR Type
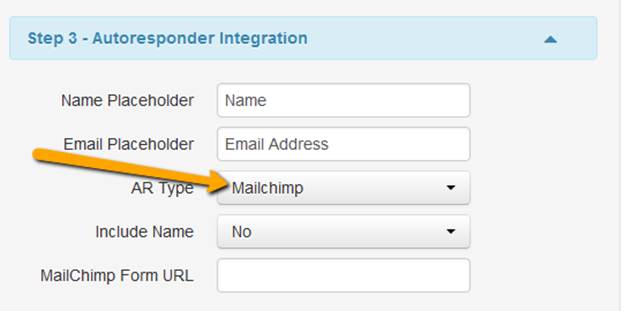
For help with finding your MailChimp Form URL please refer to this document:
http://kb.mailchimp.com/lists/signup-forms/share-your-signup-form
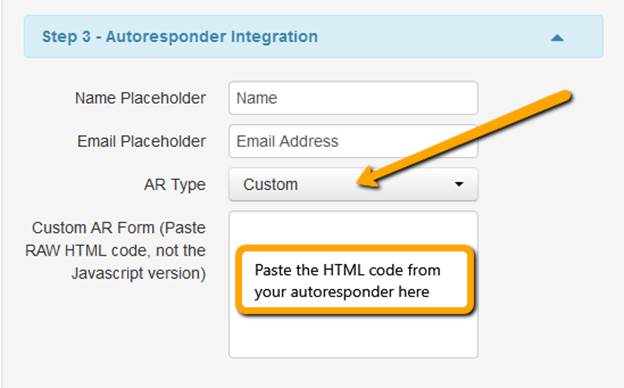
Custom Code:
Copy the HTML code from your autoresponder:
In LandingPage Monkey, use the drop down arrow to choose Custom Code as your AR Type.
Paste the copied code into the box :Custom
AR Form
Rapid Mailer:
Here is a step by step video by one of our clients:
https://www.youtube.com/watch?v=YlZ7Us1ltWI
Constant Contact
In Constant Contact:
1 Click the MORE icon on
your sign-up form and then select Inline
Code.
2 Copy the code.
In LandingPage Monkey: Paste the
code as Custom Code
Autoplay video backgrounds will
not work on mobile phones (a restriction beyond our control and set by the mobile phone companies so as
not to consume bandwidth of their users).
We have built-in fall backs in place so that mobile visitors
will see either a full screen background image or simple background color of
your choice.
We suggest you place an image taken from your video as the
background image in Step 1 of Create Page when setting up your landing page so
that your mobile viewers at least see "something" of your video.
You can see the effect on this page: http://clika.pe/l/4/22843/
In order to use your own images for the background in your Landing Page, you need to upload them to your own hosting/image store and get the URL from there.
When you want to select a YouTube video for the background of
your landing page, you do need to use the full URL
from YouTube, not one of the automatic YouTube shortened URLs
For Example: https://youtu.be/Jhmok_dL43w will
not work in LandingPage Monkey - you need to paste
this into your browser address bar and grab the full URL
![]()
The usual procedure is that you use Landing Page Monkey to create a landing page/squeeze page offering a free report or some such so you can capture your prospect's name and email in your autoresponder account. As soon as they signup you redirect them to your sales page with the pay button on it.
The first email in your autoresponder sequence contains details on how to access the free report or whatever you offered in exchange for their email address.
To show your own domain name in the URL of your landing page,
you need to download the HTML version created by LandingPage
Monkey - using the link given when you save or get code. Then upload it to your own server.
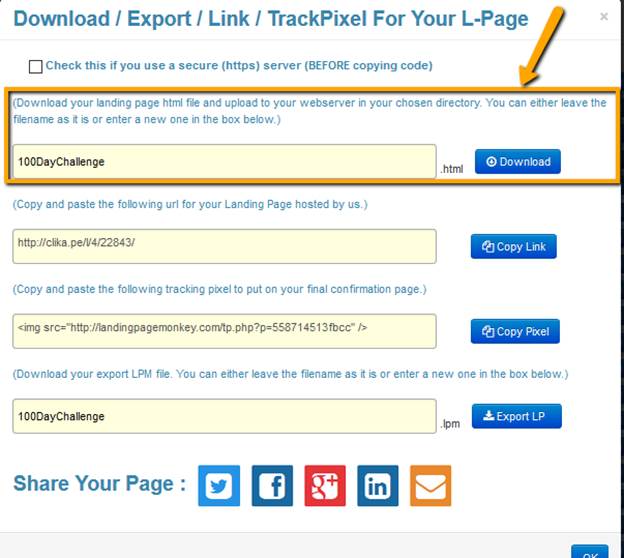
There is a step by step video showing you how to do this
inside your account by clicking HELP

If you just want to not use our clik.pe URL, you can use a
link shortner like http://bit.ly.com.
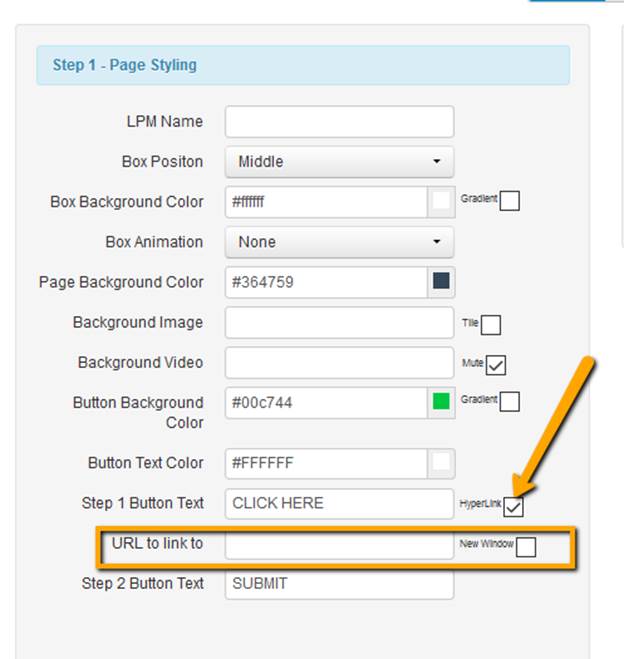
You can skip the opt-in box by placing a redirect URL for the
button on the first box but there is no way to skip the first box and just have
2nd - the opt-in form. Here's the screen shot of the setting:
Please take note that the page where you redirect the user
needs to be done elsewhere.
Dropbox is NOT really suitable for live streaming of video
files - we strongly recommend you invest in something like Amazon AWS S3 which
is very economical and a very satisfactory solution.
LandingPage Monkey has to do a lot of real-time sizing and
manipulation etc. and
- so Dropbox cannot be used for the background video in Step 1 of
creating your landing page. However, you
can, if you must, use Dropbox for videos in your Page Content at Step 2
Once your account is created we cannot change your username as it
is used to encode your account to ensure uniqueness within our database and
links back to the payment on record
You can change the email address we communicate with
you. Please send us an email from the
existing email address giving both the old and the new email addresses and tell
us which products you have an account in and we will make the necessary changes
within 48 hours of your request.
Passwords are system generated. With current security features it has been
shown to be better (more secure) to use system generated passwords. .
You can manage your own password by using the FORGOT PASSWORD
feature that you find on the logon page. Check the "Related Articles"
for the Login URL if you are unsure of that
We are aware of the latest update to Chrome 66 which disables
autoplay for videos with sound (muted/silent videos
still autoplay)
You can read more about it HERE
Basically - muted videos will still play but with no
sound. UNMUTED videos will not be
allowed to even load.
So please be sure to use any means necessary to MUTE your
videos. Let your viewer request the
sound.
Thank you for understanding
With LandingPage Monkey, you create
individual pages.
You can link to each to create a funnel but it's not
automatic like Clickfunnels.
LandingPage Monkey
creates high converting squeeze pages quickly and easily.
Follow the step by step training videos in the HELP section
of your account.
You will, of course, need to have signed up to an
autoresponder - we recommend Aweber, GetResponse and MailChimp, but LandingPage
Monkey can be integrated with ANY autoresponder (AR). In your AR you will need to create the list
to which subscribers will be added, and the opt-in form for them to do so. It is this form that integrates in LPM,
sending subscribers to your list
LandingPage Monkey
provide some tracking right there on your dashboard. However if you want
to use different tracking for your Landing Page, you will need to get the
tracking pixel code from that tracking provider - for example from Facebook or
a tracker such as trck.me.
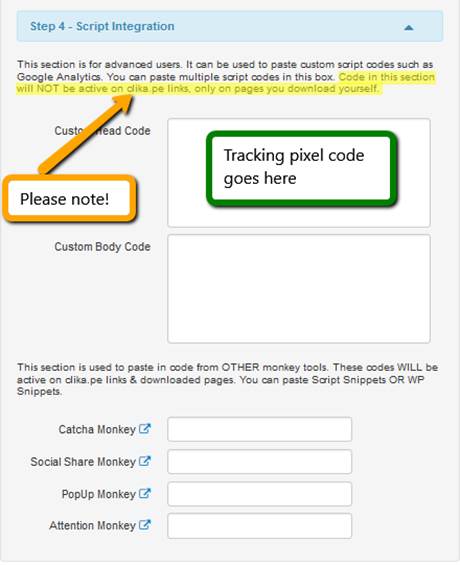
You may then add this code to your landing page as custom
code for tracking pixels.
However, please remember that the custom code only works on self-hosted
pages. For security reasons we don't run code on our
servers.
Please be aware that pages integrated with WordPress are
still hosted on our server so the tracking pixel still won't run.
LandingPage Monkey
Are you downloading the page and
uploading the file/page to your own webspace? Just checking!
You do not need hosting in order to use LandingPage
Monkey - we host the pages for you!
Because each of our Apps are web based
services (SaaS) you don't have to waste time with messy installs or fret about
modifying or editing any confusing code.
It's fast, smart and simple! And
all upgrades are immediately available to you.
YES! You'll be pleased
to know that we have included the basic layout for you - all you need to do is
choose a few options to make a page that is truly unique to you. Having chosen your colors, logo, layouts, etc, you can clone your page and have your very own
"template"
or several distinct templates - all ready to go for your own
business
LandingPage Monkey
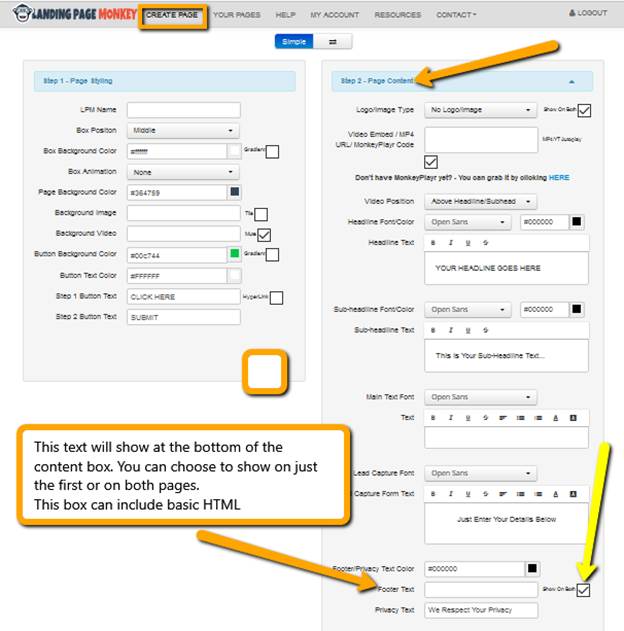
creates a 2-step Landing Page: ( for
Step 2 Options click here)
Step 1
1: Background
This you can choose to be a video (no audio), an image or a
color. On the provided layout there is a solid color but we have shown a non-standard
image for illustration purposes!
2: Content Box
You can make the following changes by simply changing the
values set as a default:
1 Position - this can be Left, Middle,
Right
2 Color - of your choice - On the
provided layout, this is white but we show that this can easily be changed
3 Size - this is specified as a
percentage of the page so it it fully responsive -
from 20% to 70%
4 Transparency - Set as a percentage with
100% meaning the box will show and 0% meaning the viewer will only see the
contents
5 Shadow/Border - choose color,
thickness, border radius (rounded corners) etc
6 Entry - Various entry options like
bounce, spin, etc. Also
you can choose to delay the box entry (in seconds)
3: Logo or Image
Choose your logo or an image up to 800x800 px. This can be displayed above or below your
Headline/Subtitle
4: Video
Choose to have a video on your page (or not!) This can be a
YouTube video, MP4 or MonkeyPlayr code. Choose to display above or below your
Headline/Subtitle
5: Headline/Subtitle
Choose font and color - you don't have to worry about size as
the text is responsive and automagically resizes according to the viewer's
device!
6: Main Text
You can change the following
1 Font and color.
2 Bold, Italic, Underscore, "crossed
out"
3 Alignment options
4 Bulleted/Numbered
5 Background color of text
Again, you don't have to worry about size as the text is
responsive and automagically resizes according to the viewer's device!
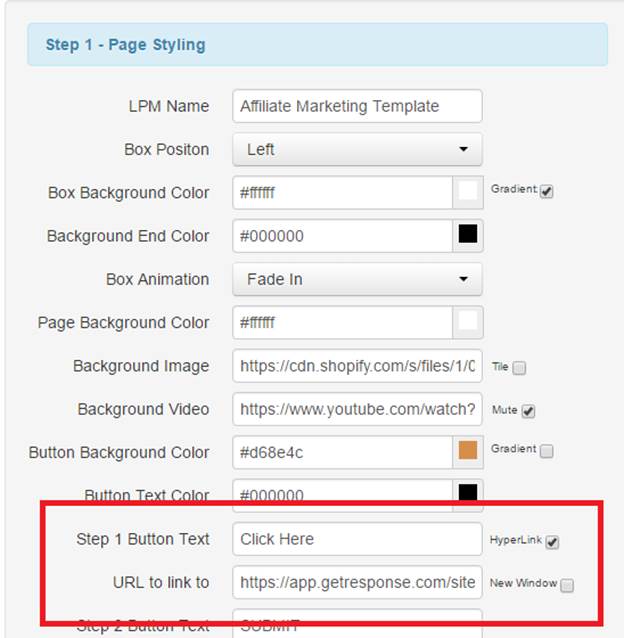
7: Step 1 Button
You can change the Button color, text, font and radius. You can also hyperlink it so that your
prospect goes to the page of your choice instead of Step 2 of your landing page
8: Footer Text
This can be text or HTML - so can be set to show the
"legal" pages if required. You
can choose to have this text only on Step 1 or on both Step 1 and Step 2
windows
Step 2
1: Background
2: Content Box
3: Logo or Image
These are carried forward from Step 1
4: Lead Capture Form Text
Enter the text and choose font, color, bold, italic, crossed
out, bulleted/numbered, background color - no need to worry about size as it is
responsive
5: Autoresponder Opt In
Form
You can integrate directly with Aweber,
Getresponse or Mailchimp - or copy and paste in the
RAW HTML code from your chosen autoresponder - to collect Name and Address, or
just Name
6: Step 2 Button
The formatting is carried forward from Step 1 Button but
you can choose to change the text
7: Privacy Text
Your choice of wording!
8: Footer Text
Carried forward from Step 1 if selected to be shown on
both steps
Yes, it certainly does! BUT it does not integrate with sites
on WordPress.com
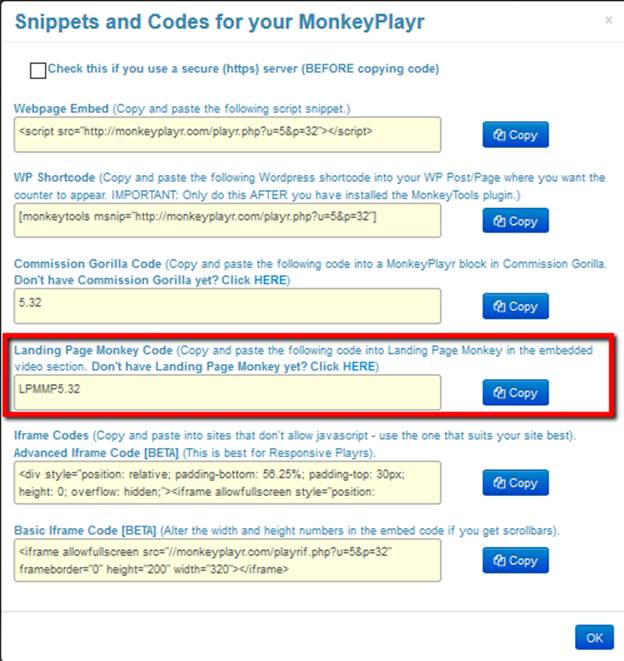
==>LandingPage Monkey:
To use a MonkeyPlayr player in your
content (Step 2), just insert the given code:
Yes, our software creates fully responsive web pages that can
be viewed just fine on any device.
Your creations will work on iPod/iPhone/iPad and android
based devices along with standard web browsers.
Note that most other plugins and scripts on the market
actually break in mobile clients.
You will get this error message if your Aweber
account was suspended but the API is still connected to your app. Please delete the API and try again
We have no plans to introduce visible controls to background
video as this would really defeat the purpose of having them
.
Font sizes in Landing Page Monkey are dynamic.
It's a very clever feature, actually. The App responsively
resizes the fonts on your page so they will fit well on any device you care to
view the page on.
That's why we don't allow the
user to set the sizes.
To do this, you need to upload using FTP or file manager in
cPanel to the ROOT of your domain with the file name index.html. This is easiest if you
have installed WordPress in a subfolder such as /wp .
You have full control of your items from the dashboard in
your account.
Once you have placed the code for your item on your pages,
you can activate, change, etc from within your LPM
account and the changes will be reflected on the pages.
Hence - it is not necessary to use Google Tag Manager for
these scripts - it's kinda doubling up on a great
feature!
As of the moment, there is no feature to do add a favicon on
your pages. However, for Landing Page Monkey, we suggest for you to download
the pages and upload them to your own server, which should support the use of
favicon.
Sadly Facebook has decided that
the clka.pe links are spam and declines to allow you to post them.
A quick search of Google for "share a blocked link on facebook" brings up several videos that show you ways
around this.
Alternatively you
can download your page, upload it to your server and use the URL from your
server.
We hope you find something that works for you!
You can easily integrate Landing Page Monkey with Aweber in step 3 of CREATE PAGE. Please see the screenshot
here:
Note that you need to create your list in Aweber
first, so that you can add it on your Landing Page.
Integrating Landing Page Monkey with GetResponse
is done at step 3 of creating a page.
You do not need to copy across the form code because GetResponse is one of our preferred partners.
There is a step by step video showing you how to do this,
which you can find by clicking HELP on the menu inside your account
Yes, you can create a sales page with LandingPage Monkey
LandingPage Monkey
To turn a landing page into a sales page
- check the "Hyperlink" box for Step
1-Button Text
- change the button text to "Buy Now"
- put your payment URL as the link
Yes LandingPage Monkey
pages are designed to look great in all popular web browsers including: Edge,
Internet Explorer, FireFox, Chrome & Safari.
LandingPage Monkey
creates 2-step landing pages because this 2-step procedure has been proven to
increase opt-ins since, once someone starts an
action (ie clicks on the button in your invitation),
they are more likely to complete the action
(fill in the opt-in form) than if you presented the opt-in form in the first
place.
A prospect is 40%-80% more likely to complete the opt-in form
if he has already clicked past the offer...
You can omit the second step - i,e, the opt-in. Check the Related Articles below
LandingPage Monkey
is a comprehensive, feature-packed tool to facilitate your online marketing.
The landing page created by LandingPage Monkey is
indeed a single page with the second box not displaying until the prospect
takes action - ie clicks on the button.
It is up to you to comply with the rules and regulations set
out by wherever you are deploying the page you have created using this tool.
AutoPlay Feature
The customers who are using our tool and promoting to their
lists, etc absolutely love the autoplay
feature.
For customers who are using our tool where autoplay is not allowed - we have ensured that it is very
simple to set the Autoplay option to NO and continue
to have success having their pages accepted.
Privacy Policy
For customers who are using our tool where they must include
a privacy policy - we have made this very simple. Full details are set out in this article:
How can I add Terms/Privacy/Disclaimer, etc
to my landing page?
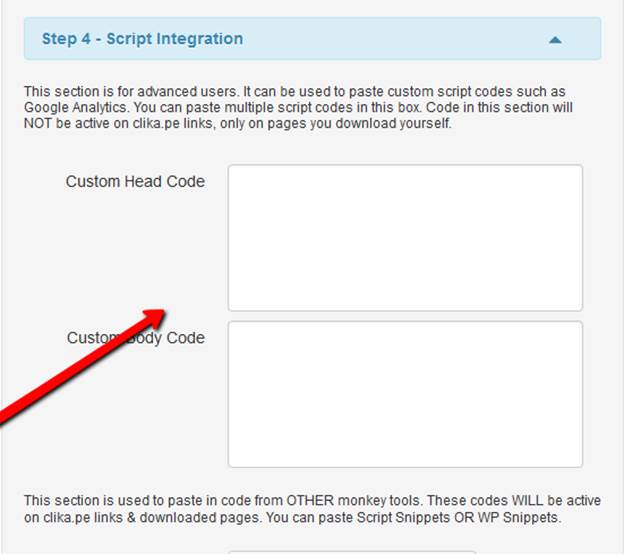
Adwords, etc
You can't promote OUR site (clika.pe hosted
links) via adwords etc. You need to put your Google codes in the
script section as per attached image, download the LPM code and upload it to
your own hosting.
When you make changes via your dashboard, these changes will
automagically be reflected in your live implementations!
You don't need to do anything more
There are a whole host of reasons for signups not appearing
in the autoresponder.
Assuming the
autoresponder is connected correctly and that there are no error messages
appearing during the setup, then some of the reasons for the signups not
appearing could be:
- The email's domain is banned by the
autoresponder -
hotmail.com, yahoo.com msn.com are commonly blocked by
autoresponders. Please contact your Autoresponder Service giving them the
details of the list in question and ask them if they are getting any errors on
their end. There may be some kind of restriction on the list you have selected.
- The email has been on a list before. If an
email has previously been on an autoresponder list and unsubscribed, the
autoresponder will never add it back on.
- The autoresponder list is set to double opt-in
and the email has not been confirmed yet. An email address won't appear until
the recipient has clicked the "confirm" link in the email sent by the
autoresponder.
If you have already checked all of the above but still, your
issue is not resolved, please contact our support team at help [at] promotelabs .com.
If you have a popup blocker set in your browser this will
prevents the preview button from working - since the preview "pops
up"!
Please check and turn it off if necessary.
Selling LandingPage Monkey Pages to Clients
If you want to use LandingPage
Monkey to build, manage and sell pages to your clients you will need a
Developer license which you can access from inside your account area.
You will be able sell or give away .LPM
import/export templates to your customers and partners to use but they will
also need the software to use them.
You can set your Page title and meta description for your
landing page in the Advanced SEO Options section
of Create Page
Be sure you are using the ADVANCED mode in LandingPage Monkey as show in this screenshot:
Landing Page Monkey URL (clika.pe)
When you share your URL on Facebook, there is no image for
Facebook to pick up - but the link will work when clicked. To show an image,
download the page, edit the header to include the Facebook meta tags you want
for images, etc and upload to your server.
You then share the URL of the page on your server.
If you are using the AutoResponder
feature in LandingPage Monkey then you cannot skip
the second step of Name and Email address fields.
However, you can use the Hyperlink feature to redirect
customers to your autoresponder page directly without using the landing page AutoResponder Integration feature.
You need to add your autoresponder form URL in the "URL
to link to" field in step 1.
Step 2- Page Content.
In order to successfully upload an image here, the size
restrictions must be adhered to... that is:
- a file size no larger than 150KB AND
- image dimensions not larger that
800 x 800 pixels
The following shows how to find your image dimensions and
file size. (The examples show the
actions in Windows 10)
Should you need to change either of these, we suggest using
Paint.Net (details below)
Image Dimensions & File Size
Hover over the image in the directory you will see the
dimensions and file size
1 The dimensions may be any
size but not exceeding 800 x 800
2 The size can be anything less than
150KB
Image File Size
Hover over the image as above or right click on your image
file and select "Properties" you will get something like this: ( properties for 2 different images are shown here)
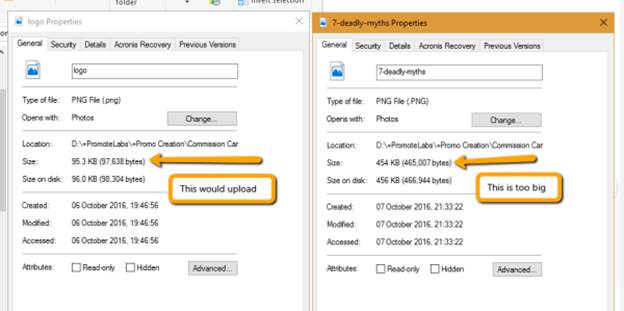
As you can see, the first is less that
150 KB and so will upload; the second is too large.
To Resize Image
You can download the free application Paint.net from http://www.getpaint.net/index.htm.
This helps you easily
resize your image either for dimensions or for file size with regards to KB.
You can
upload your image to your own webspace (website or blog), or use
Amazon S3, a paid but very cheap alternative.
An alternative might be Dropbox. Once you have uploaded your images on
any of these storage service, be sure to get the actual URL of the image and
add it to the URL field in your page settings.
DROPBOX
The Dropbox Share URL directs you to where you, or others,
can view your image. This link from
Dropbox does not allow images, etc to be inserted
directly into webpages using this URL.
To pull an image stored on Dropbox directly onto a page,
1 Log in to your online Dropbox account
2 Click on the SHARE button next to the
image you want to use
3 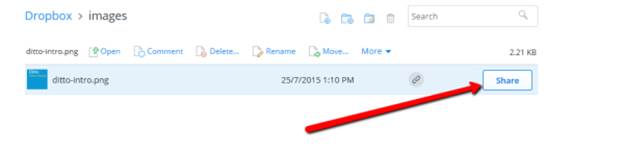
4 Click the COPY LINK text
5 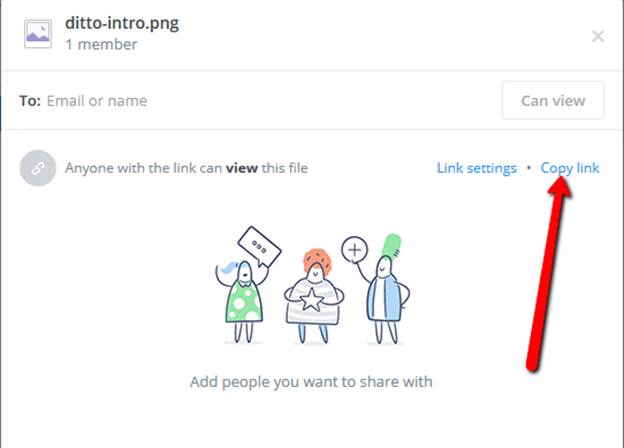
6 Change the URL
that Dropbox gives : At the end of the URL,
replace ?dl=0 with ?raw=1
EG:
Dropbox Share URL: https://www.dropbox.com/s/drhayyfvjg/Gorilla.png?dl=0
Change URL to: https://www.dropbox.com/s/drhayyfvjg/Gorilla.png?raw=1
5. Paste this URL into the Image field
PHOTOBUCKET
To use an image from Photobucket you'll need to the find the
image URL. Make sure that you copy / paste the Direct image URL (it ends in
.jpg) and ensure it's shared publicly.
Amazon Prime Photos
is not an image storage service, it's an image delivery service. It doesn't just store the data for an image, it
presents a full on web page containing that image. So it is unsuitable for storing images for the Marketing Web
Apps
The information below explains the responsiveness of the
background image in a landing page created using LandingPage
Monkey:
When we resize a background image we
don't want to change its aspect ratio otherwise it would look squashed or
stretched. So we keep it centered and crop it so it
fits but doesn't stretch or squash, and doesn't have black borders top/bottom
or left/right. If you are going to fit a round peg in a square hole then there
is going to be a compromise somewhere.
It's just basic geometry.
Imagine a 1920x1080 image.
- On a 1920x1080 16:9 aspect ration
screen it will look perfect at 1:1.
- On a 1280x720 16:9 aspect ratio screen we zoom
it out and retain the ratio and it still looks perfect (but not as sharp).
- NOW... If we then have to display the image on
a NON 16:9 screen, eg: 1024x768 - which is 4:3 ratio
then we have to either do one of the following:
- 1. Retain the whole image but put black bars at
the top/bottom.
- 2. Stretch the image.
- 3. Crop the image.
Option 1 would
completely destroy the appearance.
Option 2 would
not make sense with most images. Imagine, for example, a giraffe, it's neck
would end up being even longer than usual or much shorter than it should be.
The only sensible solution is Option
3. So, we go for it.
Backgrounds on LPM are designed for decoration, NOT to be the focus of
the page.
You can have a responsive image in the Page Content : add the image, make the box 70% of the page,
select "Middle" for position.
The image will now be fully responsive.
You can create a Thank you page by putting the message as
your content in Step 2 and selecting to have the 1st button be a hyperlink to
direct your prospect to another offer, your blog, etc
while they wait for the link to your gift in their inbox!
The setup for a very simple Thank You page looks like this:
And the simple Thank You Page looks like this:
You can of course add a background image / video if you wish
just like for your landing page
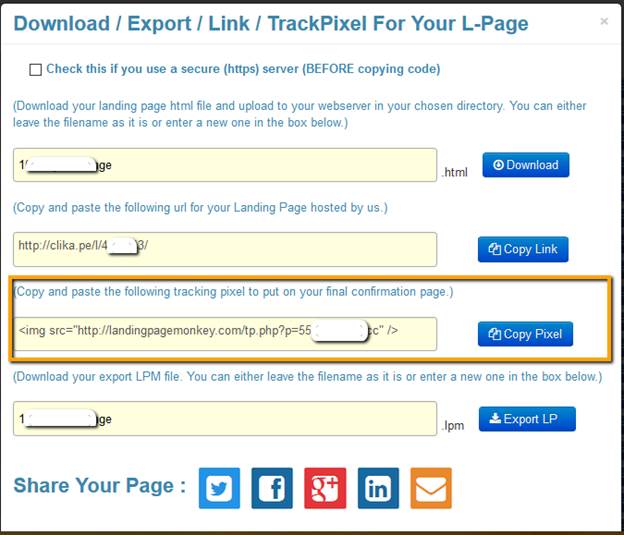
For LandingPage Monkey to be able
to track how many prospects who view your landing page actually go through and
access your download page, you need to take the tracking pixel code given to
you when you create your landing page and paste it into your download (thank you)
page.
- For a Wordpress page, many themes have a section for "Custom
header" code - paste it there.
- For HTML pages, paste it between the
<head> and the </head> tags.
- For page builders, look for the section for
"Custom code for header ares" or similar
If you want to store your image on Google Drive and then
embed on you page, you do need to do more than grab the "Share"
link. Please follow the steps in this
video
https://www.youtube.com/watch?v=Y1joksnUW04
Please note: Promote Labs does not own this video ... we put
the link here for your information only.
For a written explanation CLICK HERE
You can use any language you want that uses a Western
character set. Just now it is not possible to use any other language fonts in
the text editor.
As a work around, you can copy and paste the language text
from your local text editor, for example Microsoft Word or Google translate, to
the text editor in LandingPageMonkey and it will
display fine.
Any size video is fine, but the bigger sizes will be sharper
� an MP4 file is required if you are hosting it yourself.
You may also use Vimeo or Youtube
to store your videos
To set a video background you just need to enter the URL of
where the video is stored.
This shows the "help text" for that field in
Landing Page Monkey. Please take note that the video can be stored anywhere and
it should work on your LPM page.
Thrive Themes is
* A WP theme
* So many features it can take days to build a page
* $19-$49 per month
ClickFunnels is
* a software that lets you design and create sales pages,
landing pages and it lets you manage your entire sales funnel.
* $97 a month after the trial
WP Profit Builder and Instabuilder
are
* WordPress Plugins
* Create Sales/Squeeze pages
* Have annual fee for support
OptimizePress is
* Wordpress Theme
* Creates Sales/Opt-in/Membership pages
* Annual fee
* So many features it can take days to build a page
LandingPage Monkey is
** A web app whose pages can also be loaded to your WP or
non-WP site
** Creates high converting landing pages
** Pages can be hosted by LPM, on your own WordPress site, or
uploaded to your own domain.
** $37 annually after the trial
And it will only keep getting better give it a try for $1 and
you're set for life with an awesome tool
Did we mention the cloning features?
When using a Youtube video for background, do you hide the Youtube watermark and link to video on Youtube?
When you add a YouTube video in the background, it does not
show any link. However, if a video contains any watermark/design then it would
display - the watermark is the video owner's trademark
We recommend that when creating your page
you keep your background image to
width="1920px"
height=�1080px."
When you purchased LandingPage
Monkey, you received a bundle of background images as a bonus
To find them, please go to your "My Account" page
and scroll down. Download the .zip file
to your computer, unzip it and upload the chosen image(s) to your own webspace
- your own hosting, Dropbox, Amazon S3, etc
When you clone an item in your dashboard it will be named
"Clone of <original name>"
For Commission Gorilla, the clone will be named: Clone -
<identifier>, for example: Clone - 56421df9ba862
The CLONE button will create the clone, name it as above and
bring you to the edit screen - where you can simply give it a more meaningful
name
For example in LandingPage
Monkey:

You can rename the page to whatever you like - just as you do
for any new page.
The new name will show on your dashboard once you click Save
In this example I renamed the Landing Page to "create
video box - split test"
This happens when you have a background video selected. Unfortunately, a video needs a second or two
to download the first few frames and there isn't anything we can do about that
without looking into changing the core technology of the our
video platform.
We suggest trying the following "work arounds"
- Replacing the video with an image - or adding
an image in addition to the video
- Set a box delay (under Advanced Box Design
Options) of, say, 2 seconds to your page so that the initial box takes 2 seconds
to load. This way, the entire screen is black and it just looks like any normal
webpage loading (which is, actually, what is happening with the video).
Yes, LandingPage Monkey creates an
html file that you can download and then upload to your server.
There is a step by step video showing you how to do this,
which you can find by clicking HELP on the menu inside your account
Currently, LPM does not have a back up
feature. Sadly, we cannot retrieve it for you.